A Better Spaced Repetition Learning Algorithm: SM2+

29
Filed under Uncategorized

By far the most popular algorithm for Spaced Repetition is SM2.  Sites like Anki, Duolingo, Memrise, and Wanikani all chose SM2 over later SM-iterations (eg. SM15) because it is extremely simple, yet effective.  Despite that, it still has a number of glaring issues.  In this article I explain those issues, and provide a simple way to resolve them.

Original SM2 Algorithm

The algorithm determines which items the user must review every day.  To do that, it attaches the following data to every review-item:

  • easiness:float – A number  1.3 representing how easy the item is, with 1.3 being the hardest.  Defaults to 2.5
  • consecutiveCorrectAnswers:int – How many times in a row the user has correctly answered this item
  • nextDueDate:datetime – The next time this item needs to be reviewed

When the user wants to review, every item past its nextDueDate is queued.  After the user reviews an item, they (or the software) give themselves a performanceRating on a scale from 0-5 (0=worst, 5=best).  Set a cutoff for an answer being “correct” (defaults to 3). Then make the following changes to that item:

easiness += -0.8 + 0.28*performanceRating + 0.02*performanceRating^2

consecutiveCorrectAnswers = \begin{cases} consecutiveCorrectAnswers+1, \text{   if correct} \\ 0, \text{   if incorrect} \end{cases}

nextDueDate = \begin{cases} \text{now + $(6*easiness^{consecutiveCorrectAnswers-1})$ days}, \text{   if correct} \\ \text{now + 1 day}, \text{   if incorrect} \end{cases}

Problems with SM2

SM2 has a number of issues that limit its usefulness/effectiveness:

Problem: Non-generic variable ranges

The variable ranges are very specific to the original software, Supermemo.  easiness is a number  1.3, while performanceRating is an integer from [0,5]

Solution

Normalize easiness and performanceRating to [0,1].

This requires setting a max value for easiness, which I set to 3.0.  I also replaced easiness with difficulty, because it’s the more natural thing to measure.

Problem: Too many items per day

Because every day we do all the overdue items, it’s easy to encounter situations where one day you have only 5 items to review, and the next you have 50.

Solution

Only require doing the items that are the most overdue.  Use “percentage” of due-date, rather than number of days, so that 3 days overdue is severe if the review cooldown was 1 day, but not severe if it was 6 months.

This allows review sessions to be small and quick.  If the user has time, they can do multiple review sessions in a row.  As a bonus, this allows “almost overdue” items to be reviewed, if the user has time.

Problem: Overdue items all treated equally

If the user completes a month-overdue item correctly, it’s likely they know it pretty well, so showing it again in 6 days is not helpful.  They should get a bonus for correctly getting such overdue items correct.

Additionally, the above problem/solution allows almost-overdue items to be reviewed.  These items should not be given full credit.

Solution

Weight the changes in due-date and difficulty by the item’s percentage overdue.

Problem: Items learned together are reviewed together

Items that are learned together and always correctly answered will always be reviewed together at the same time, in the same order.  This hinders learning if they’re related.

Solution

Add a small amount of randomness to the algorithm.

Other adjustments

  • The quadratic term in the difficulty equation is so small it can be replaced with a simpler linear equation without adversely affecting the algorithm
  • Anki, Memrise, and others prefer an initial 3 days between due-dates, instead of 6.  I’ve adjusted the equations to use that preference.

The Modified “SM2+” Algorithm

Here is the new algorithm, with all the above improvements in place.

For each review-item, store the following data:

  • difficulty:float – How difficult the item is, from [0.0, 1.0].  Defaults to 0.3 (if the software has no way of determining a better default for an item)
  • daysBetweenReviews:float – How many days should occur between review attempts for this item
  • dateLastReviewed:datetime – The last time this item was reviewed

When the user wants to review items, choose the top 10~20 items, ordered descending by percentageOverdue (defined below), discarding items reviewed in the past 8 or so hours.

After an item is attempted, choose a performanceRating from [0.0, 1.0], with 1.0 being the best.  Set a cutoff point for the answer being “correct” (default is 0.6). Then set

percentOverdue = \begin{cases} Min(2, \frac{days(dateNow - dateLastReviewed)}{daysBetweenReviews}), \text{   if correct}\\ 1, \text{   if incorrect} \end{cases}

difficulty += percentOverdue*\frac{1}{17}(8-9*performanceRating)\text{, clamp to [0,1]}

difficultyWeight = 3-1.7*difficulty

daysBetweenReviews *= \begin{cases} 1+(difficultyWeight-1)*percentOverdue*rand(0.95,1.05), \text{   if correct}\\ 1/(1+3*difficulty), \text{   if incorrect (max days = 1)} \end{cases}

Daily Review Sessions

The above algorithm determines which items to review, but how should you handle the actual review?

That’s the topic for my next post – stay tuned!
Using Vector3.Lerp() correctly in Unity

48
Filed under Uncategorized

A lot of Unity 3D tutorials online use Unity’s linear interpolation incorrectly, including the official video tutorials(!). However, it’s actually very easy to use, once you understand how it works.

The prototype for Vector3.Lerp looks like this

static Vector3 Lerp(Vector3 start, Vector3 finish, float percentage)

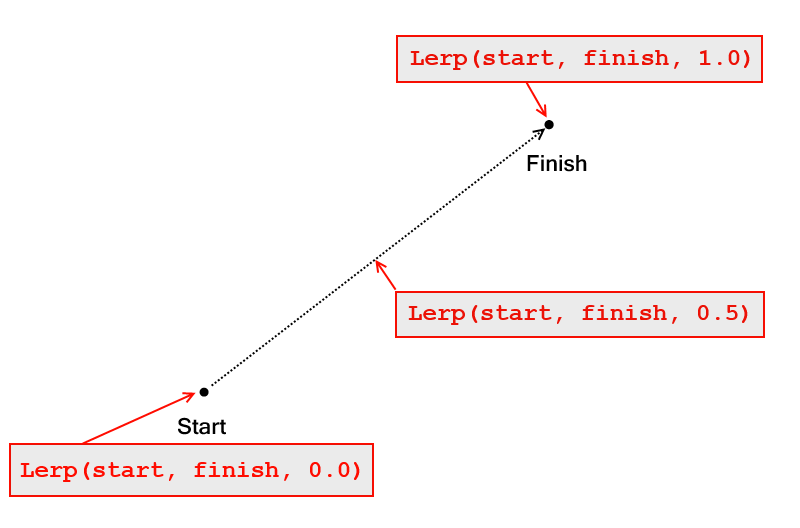
What it does is simple: it returns a point between start and finish, based on the value of percentage:

  • At percentage = 0.0, Lerp() returns start
  • At percentage = 1.0, Lerp() returns finish
  • At 0.0 < percentage < 1.0, Lerp() returns a point between start and finish.
  •    So at percentage = 0.5, it returns the point exactly halfway between start and finish.
  •    And at percentage = 0.10, it returns a point very near to start

etc.

Linear Interpolation Example

This explains why it’s called linear interpolation: It moves smoothly (interpolates) at a constant speed (linearly) between two points!

How to use Lerp correctly

To use Lerp() correctly, you simply have to make sure that you pass the same start and finish values every frame while moving percentage up from 0.0 to 1.0 each frame.

Here’s an example. When the spacebar is pressed, we’ll lerp our object 10 spaces forward over a period of 1 second.

How to use Lerp incorrectly

In our above example, we call Vector3.Lerp() like this:

transform.position = Vector3.Lerp(_startPosition, _endPosition, percentageComplete);

However, the method for calling Lerp you see in many tutorials online looks like this:

transform.position = Vector3.Lerp(transform.position, _endPosition, speed*Time.deltaTime);

Before I explain what’s wrong with this, please take a moment and try to figure out for yourself what this code will do, and why it’s wrong


…Ready?

The issue with the above code is that the first parameter to Lerp(), transform.position, changes every frame! Additionally, the percentage parameter (the third parameter) does not increase from 0.0 to 1.0, but instead is set to the completely arbitrary value speed*Time.deltaTime.

What this code actually does is move the object speed*Time.deltaTime-percent closer to _endPosition every frame.

There are several problems with this.

  1. It’s non-linear ie. the speed is not constant. This is easy to see in the official video tutorial; the object moves quickly at first, and slows down as it nears its destination
  2. The object’s speed varies with the user’s framerate. The higher the user’s framerate, the faster the object will move. This defeats the purpose of using FixedUpdate() to begin with, which is supposed to alleviate this problem.
  3. The object never reaches its destination since we only move a percentage closer each frame. Actually, due to floating-point rounding, it may or may not ever reach its destination. Additionally, because of problem 2, whether or not it ever reaches its destination depends on the user’s framerate. Ouch!

The implementation of Lerp

As a final note, I’d like to share how Lerp() is typically implemented. This section is not required, but mathematically-inclined readers will find it interesting.

Implementing Lerp() is actually remarkably simple:

(Edit Oct 2016: A commenter correctly pointed out that this implementation of Lerp() has floating-point rounding issues. See his comment for a more accurate version)

How fast are computers in everyday terms?

0
Filed under Uncategorized

It’s hard for humans to understand just how freakishly fast modern computers are. Here’s an analogy that has helped me:

Imagine that it takes you 1 second to do a simple computation, like adding two numbers. If you were to sit at your desk and add numbers all day non-stop, with no sleep, every day of every month of every year, it would take you 95 years straight to do what a computer can do in one second.

95 years. That’s probably longer than your entire life. Stop to think about how many seconds have passed in your life, and how many more will need to pass before you hit 95 years old. A computer does that much work every second.

Now that we have a relatable timescale, here are some approximate computer-times for some programming tasks (and other things). Keep in mind that 95 years of computer-time is one second of real-life time. The following are all in computer-time (Based on Intel i7 x86 timings):

Time for light to travel 1 cm (in vacuum)0.1 seconds
Addition/subtraction1 second
If statement2 seconds
Integer multiplication5 seconds
Cache miss (L1 to L2)10 seconds
Function call††8-12 seconds
Virtual function call††12-14 seconds
If statement (branch prediction failure)20 seconds
Integer division17-28 seconds
Cache miss (L2 to L3)40 seconds
Cache miss (L3 to DRAM)2 minutes
SHA1 hash of 64-byte message15 minutes
Call to malloc() (rough estimate)30 minutes
Time for a speeding bullet to travel one inch3 days
Fastest Windows Timer Resolution (0.5ms)2 weeks
Read 1MB file with high-end SSD drive (1.9ms)2 months
Fastest blip the human eye can see (2ms)2.25 months
Executing a large-ish SQL statement (3ms)3.5 months
Time between frames in a 60fps video game (16.6ms)1.5 years
Time it takes an incandescent lightbulb to turn on (90ms)8.5 years
Average human reaction time (220ms)21 years

That’s assuming a 3 GHz x86 CPU with one core and no throttling or instruction level parallelism. If we took into account the multiple cores and ILP that modern CPUs have, the time would be in the 1000’s of years!
†† Includes cost of pushing 2 parameters, plus the stack-frame setup. Note that the compiler can sometimes optimize virtual-methods to be called non-virtually.

Sources:
http://www.agner.org/optimize/instruction_tables.pdf
http://hacksoflife.blogspot.com/2007/04/c-objects-part-8-cost-of-virtual.html
http://arctic.org/~dean/crypto/sha1.html
http://www.humanbenchmark.com/tests/reactiontime/stats.php
http://www.youtube.com/watch?v=grTDjsMWIPg
http://voices.canonical.com/jussi.pakkanen/2011/09/27/is-malloc-slow/
http://www.tomshardware.com/charts/ssd-charts-2012/AS-SSD-Sequential-Read,2782.html
http://en.wikipedia.org/wiki/Orders_of_magnitude_%28speed%29
http://stackoverflow.com/a/10274402/238419

A Heap-Based C# Priority Queue Optimized for A* Pathfinding

4
Filed under Uncategorized

In fine-tuning my Pathery application, I found the need for a faster priority queue.  Since this could be useful to others (pathfinding is often a bottleneck for video games), I finally got around to publishing it.

You can find it here; or read the documentation here.  Enjoy!

Note: If you found this page hoping to optimize your pathfinder, you may want to check out this post first, which has a few tips on optimizing pathfinders for games.

Branchless Conditionals (Compiler Optimization Technique)

10
Filed under Uncategorized

One of the neater and lesser-known optimizations a compiler can perform is a “branchless conditional” – a conditional statement that contains no branches.

To understand what this means, take a look at the following C-snippet:

When compiled with no optimizations in Visual Studio, this is the output

Nothing surprising here – almost a literal translation from C to assembly. Small, fast, efficient – what could we possibly improve upon?

One possible improvement could be removing the conditional branch – the jne instruction.

Branch instructions are not in-and-of themselves particularly slow; all a jmp instruction does is write a value to the Program Counter (PC) register, and on a simple CPU which reads and executes one instruction at a time, jne wouldn’t be slower than any other instruction which writes to a register. However, modern CPUs are anything but simple.

On modern CPUs, instructions are not read then immediately executed, one-by-one. Rather, the process is split into multiple stages, called the Instruction Pipeline. This allows, for example, the instruction two instructions in the future to be fetched (read) while the next instruction is being decoded and the current instruction is being executed, and the previous instruction is writing its results to memory! This speeds up execution time enormously, but now that the CPU is essentially executing multiple instructions at once, the CPU designers must take extreme precautions to make sure that the results of the execution are still correct!

And herein lies the problem with conditional jumps like jne: How does the processor know what the “next” instruction will be before it actually executes the conditional? The answer is: it doesn’t. It can guess (real-world programs are highly predictable, so Intel CPUs are able to guess correctly ~90% of the time), but if it guesses incorrectly, the entire Instruction Pipeline must be flushed: all the work the CPU did fetching and decoding the instructions it thought were going to be executed is invalidated and completely removed from the pipeline, and the entire pipeline sits around doing nothing while it waits for the jne instruction to complete. Essentially, a jne instruction with a failed prediction causes our fancy expensive pipelined CPU to act as though it were a boring old non-pipelined CPU.

(In fact, the situation is even more complicated than that: modern CPUs essentially have multiple pipelines, meaning they literally execute more than one instruction at once, even if there is only one core and the program is single-threaded. When a conditional-jump prediction fails, all these pipelines must be flushed and stalled, so all the pipelines sit around doing nothing when the conditional-jump executes)

Knowing all of this, let’s see how Visual Studio compiles the above code with optimizations enabled:

Whoa, what happened there? There are no longer any branch instructions! Let’s translate this back to C, to help see what’s going on:

It appears the branches have been replaced with some clever math and bit-fiddling. Here’s how it works (don’t feel bad if you have to read this over a few times, this is complex stuff!):

  • We set eax = SomeFunc() - 4. Thus, if SomeFunc() == 4, eax = 0; otherwise, eax != 0.
  • neg eax will set the carry-flag to 0 if eax == 0, or 1 otherwise. Thus, the carry-flag gets set to (eax != 0).sbb A, B (sbb means “subtract with borrow”) essentially does A = A - (B + carryFlag). Thus, sbb eax, eax sets eax = 0 if the carry-flag was 0, or eax = -1 if the carry-flag was 1. At this point, if SomeFunc() == 4, eax == 0. Otherwise, eax == -1
  • Finally, we take the bitwise-AND of eax with -52, and add 54. Since 0 & -52 == 0 and -1 & -52 == -52 (Remember, in 2’s complement -1 has all bits set, so -1 & x always equals x), this means that if SomeFunc() == 4 (and thus eax == 0), the result will be 0 + 54 = 54; while if SomeFunc() != 4 (and thus eax == -1), the result will be -52 + 54 = 2. This is the exact same result as our original function!

So now the important question: Are branchless conditionals really faster?

Well, that depends. If the branch-predictor in the CPU is consistently right for our code, the instruction pipeline would never need to be flushed, and the code with branches would be faster – it does, after all, involve fewer operations. If, however, the branch-predictor is wrong often enough, the instruction pipeline will need to be flushed all/most of the time the code is run, which would make the branchless code faster. And unfortunately, there is no way to determine if the branch predictor will guess correctly for your code. Thus, if this is an absolutely critical portion of your code: Profile! Test both code-chunks (branchless and branching), and see which is faster in your case!

And, for the love of god, don’t write your code like the “rough translation” above to try to force the compiler to write branchless code. Not only will you confuse the compiler and probably end up making your code slower, but you will drive whoever has to maintain the code absolutely insane.


Just for reference, here are some more examples of branchless conditionals:

Example from Eldad Eilam’s “Reversing: Secret of Reverse Engineering”:

Example from http://stackoverflow.com/questions/539836/emulating-variable-bit-shift-using-only-constant-shifts

Example from http://stackoverflow.com/questions/1610836/branchless-code-that-maps-zero-negative-and-positive-to-0-1-2

Making Use of Spare Hard-Drives

7
Filed under Uncategorized

1+2+3+… = -1/12

1
Filed under Uncategorized

The following is from an essay on Ramanujan I wrote a few years back. Enjoy.


…they recognized Ramanujan’s enormous talent for mathematics, and together they convinced Ramanujan to write to English mathematicians about his discoveries. […] The third letter he wrote, to M. J. M. Hill, received a reply, but was not very encouraging. In his reply, Hill stated,

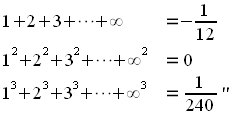
Mr. Ramanujan is evidently a man with a taste for Mathematics, and with some ability, but he has got on two wrong lines. He does not understand the precautions which have to be taken in dealing with divergent series, otherwise he could not have obtained the erroneous results you send me, viz:–

However, the problem was not with Ramanujan’s result itself, but rather with his lack of explanation of the result – or perhaps with Hill’s lack of knowledge on divergent series.

Before Ramanujan’s result can be explained, though, we have to first take a step back over 150 years in history. In 1749, the mathematics giant Leonhard Euler wrote a paper in which he derived the paradoxical result that 1 – 2 + 3 – 4 + … = 1/4.

Theorem (Euler) 1 – 2 + 3 – 4 + = 1/4

Proof. Notice that the power series for 1/(x+1)2 is

If we assume this to be true for all x, we can plug in the value x=1 to obtain the desired result! ◊

In order for his result to make sense, Euler proposed (several times throughout his life) that an extended definition of the word “sum” be made. In his own words,
Let us say, therefore, that the sum of any infinite series is the finite expression, by the expansion of which the series is generated. In this sense the sum of the infinite series 1 − x + x2 − x3 + … will be 1⁄1+x, because the series arises from the expansion of the fraction, whatever number is put in place of x. If this is agreed, the new definition of the word sum coincides with the ordinary meaning when a series converges; and since divergent series have no sum in the proper sense of the word, no inconvenience can arise from this new terminology. Finally, by means of this definition, we can preserve the utility of divergent series and defend their use from all objections.

(It should be noted that Euler’s proof would not be valid by today’s standards, because 1 – 2x + 3x2 – 4x3 + … does not define a valid function when x=1. However, it would be valid to take the limit as x approaches 1 from the left; doing this yields the same result. Today there are many methods of finding the “sum” of a divergent series; the method just mentioned, laid out by Euler, is now known as the “Abel summation” of the series).

Now that we know what it means for a divergent series to “sum” to a certain finite value, we can ask the question of whether or not Ramanujan’s results were in any way correct.

Theorem 1+2+3+…+∞ = -1/12

Proof. This proof is due to Ramanujan – though he didn’t send it to Hill originally, he did write it down in his first notebook.

Say we set c = 1 + 2 + 3 + … Then

Subtracting the bottom row from the top,

ala Euler. Thus, c = -1/12. This result is correct to the extent that Euler’s result is correct as well. ◊

(Un)Common Questions about Electricity

2
Filed under Uncategorized

When I first began learning about electronics and electricity, there were a number of seemingly obvious questions that never seemed to be answered by my professors, books, or articles on electricity; I had to scrape together answers gradually, gathering knowledge from every source I could find.

I’m collecting these questions and answers here in the hopes that they will someday save some poor internet-goer like yourself from all the trouble I had to go through.

Contents

How to Give Someone Elf Ears and Vampire Fangs in Photoshop

3
Filed under Uncategorized

As if the Internet doesn’t have enough weird fetishes floating around, here’s a quick tutorial for beginners on how to give someone elf ears and vampire fangs in photoshop.

For this tutorial, I’ve used a stock photograph of the beautiful American model, Valerie Hatfield.

Those interested in her work can contact her here.

  1. Open your image in Photoshop
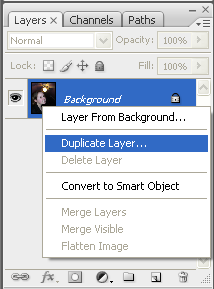
  2. As always, duplicate the background layer before anything else.

  3. Highlight the ear. This can be done rather easily using the quick-select tool (alt+click to remove from selection).

  4. Now warp the ear (edit->transform->warp) to your liking.

    (Note that you may have to remove part of the ear from the background. See any tutorial on removing objects from images – you could, for example, simply copy and paste a piece of hair over the old ear)


    That takes care of the elf ears – now let’s give her vampire teeth as well. We could use the same technique we used for the ears, but that leaves the tooth looking flat and two-dimensional; I prefer a technique which causes the tooth to affect the lips as well.

  5. Select the tooth in the same way you selected the ear.

  6. Now, using the lasso tool, add to the selection (by holding shift) a small portion of the lip and chin just below and around the tooth, as so:

  7. Open the liquify window (Filter->liquify). Using the forward-warp tool and a brush about the size of the tooth, drag the tooth downwards. Try to do it one one swift motion, using undo (ctrl+alt+z) to go back as many times as necessary.

  8. Select the Reconstuct Tool on the left, and use it to give your tooth a point. You may want to lower your brush density and experiment with different reconstruct modes (under ‘Tool Options’) to get it just right.

  9. That’s it! Here’s what the finished tooth looks like:

    And, after a few more tweaks, the final image:

How to Double the Length of Any Essay (Without Writing a Word!)

5
Filed under Uncategorized

As promised, here are a few tips to help double the length of any essay.

All of these statistics/instructions are for Microsoft Word 2007, but they apply equally well to older versions of Word or OpenOffice.

Replace All the Periods
Increase in size: 42.9%
How to do it: Go to edit->replace and place a period (.) in both boxes. Highlight the period in the "replace with" box, and click on "more" in the lower-right hand corner. Then click format->font.
Under "size," increase the font-size significantly – I used 16 in this example.
Click OK, then hit "replace all."

Increase the Paragraph Spacing
Increase in size: 21.6%
How to do it: Higlight everything (edit->select all), right-click->Paragraph. Set "Line Spacing" to multiple, and set it to something between 2 and 3 (or between 1 and 2 if it’s a single-spaced essay). I set it to 2.5 for this example.

Change the Font Size
Increase in size: 9.1%
How to do it: The font size is right next to the font face, at the top. After highlighting everything, increase it by up to a whole point – I set it a half-point larger (11.5) for this example.

Use a Different Font
Increase in size: 9.1%
How to do it: Highlight everything, and just change the font from something other than the default, Calibri. I changed it to the old default, Times New Roman (12 pt font), for the 9.1% increase, but there are probably other similiar-looking fonts that will increase that even more.

Change the Margins
Increase in size: 7.2%
How to do it: Go to Page Layout->Margins->Custom and increase the margins. They default to 1" all around – I changed it to 1.15" all around.

Change the Character Spacing
Increase in size: 7.1%
How to do it: Select everything (ctrl+a), then right-click->Font->Character Spacing. Change the spacing to something small (Half a point or less). I use 0.3pt

All effects put together:
Increase in size: 114.5% (over double!)